 Save
Save My sister texted me three weeks before her birthday asking if I could make something small and pretty for her garden tea party. I'd never attempted mini layer cakes before, but there was something about the challenge that excited me—the idea of creating something delicate enough to feel precious, yet sturdy enough to actually eat. When I finally pulled that sheet cake from the oven and the vanilla-lemon aroma filled my kitchen, I knew I'd stumbled onto something special.
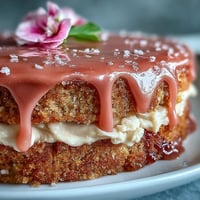
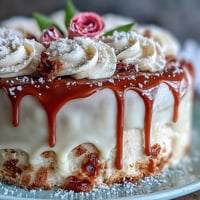
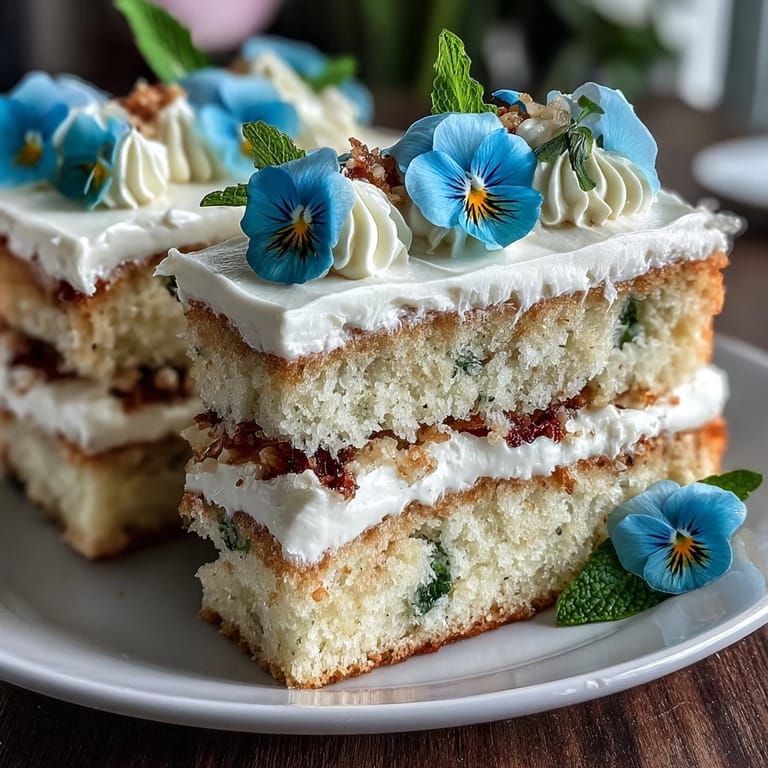
Watching my sister's face when she saw six perfect little cakes sitting on her garden table, each one crowned with a different viola in soft purple and cream, was worth every minute of planning. Her friends kept asking if I'd ordered them from a bakery, which made her laugh and immediately claim she'd made them herself—I didn't mind the lie.
Ingredients
- All-purpose flour (1 1/4 cups): The foundation that gives your cakes their tender crumb; measuring by weight keeps them consistent every time.
- Baking powder (1 tsp): Just enough lift to keep the layers from feeling dense, but not so much that they become cakey.
- Salt (1/4 tsp): A whisper of salt deepens the vanilla and lemon flavors without anyone noticing it's there.
- Unsalted butter, softened (1/2 cup for cakes): Room temperature is non-negotiable—cold butter won't cream properly and you'll fight for fluffy batter.
- Granulated sugar (3/4 cup): Creaming this with butter for a full three minutes creates the air pockets that make these cakes so light.
- Large eggs, room temperature (2): Temperature matters because cold eggs won't blend smoothly into your batter, leaving streaky pockets.
- Pure vanilla extract (1 tsp): Use real vanilla, not imitation, because you'll taste the difference in something this delicate.
- Lemon zest (1/2 tsp): Just the colored part, never the bitter white pith; fresh zest gives a brighter flavor than bottled.
- Whole milk, room temperature (1/2 cup): Cold milk can seize your batter, so let it sit on the counter while you prep other ingredients.
- Unsalted butter for buttercream (3/4 cup): Softened butter beats into a cloud-like frosting that spreads like silk.
- Powdered sugar, sifted (2 cups): Sifting removes lumps that would otherwise create a grainy frosting no amount of mixing can fix.
- Edible flowers (about 1 cup): Purchase from verified suppliers only; farmer's market flowers or homegrown ones that haven't been sprayed are safest and taste fresher.
Tired of Takeout? 🥡
Get 10 meals you can make faster than delivery arrives. Seriously.
One email. No spam. Unsubscribe anytime.
Instructions
- Set your stage:
- Preheat to 350°F and line your baking sheet with parchment paper, then give it a light grease so nothing sticks. Having everything measured and at room temperature before you start mixing is the quiet confidence that separates good bakers from frustrated ones.
- Build your dry base:
- Whisk flour, baking powder, and salt in a medium bowl until they're evenly distributed. This ensures the leavening spreads throughout your cake rather than creating random pockets.
- Cream butter and sugar:
- Beat them together for a full three minutes until the mixture looks pale, fluffy, and noticeably lighter in color. Listen to the mixer—you'll hear the sound change as you incorporate air.
- Gently fold in eggs:
- Add them one at a time, beating just until each egg disappears, then mix in your vanilla and lemon zest. Over-beating now can make your cake tough, so restraint is your friend.
- Build your batter in thirds:
- Alternate dry ingredients and milk, starting and ending with dry, mixing gently after each addition. This prevents overdeveloping the gluten and keeps your cakes tender.
- Bake with confidence:
- Spread batter evenly on your prepared sheet and bake for 18 to 22 minutes until a toothpick comes out clean or with just a few moist crumbs. The cake will smell golden and look set at the edges.
- Cool completely:
- Patience here prevents frosting from melting into puddles; cool the cake right in the pan, then transfer to a cooling rack if you have one. This takes about 45 minutes and is the perfect time to make your buttercream.
- Cut your circles:
- Using a 2.5 to 3 inch round cutter, cut 12 circles from your cooled cake layer, saving scraps for cake pops or breakfast snacking. If you don't have a perfect cutter, even a drinking glass works.
- Whip your frosting:
- Beat softened butter until creamy, then gradually add sifted powdered sugar, vanilla, salt, and a tablespoon of milk, beating until it's light, fluffy, and spreadable. This takes about two minutes and transforms simple ingredients into clouds.
- Add color if you wish:
- A tiny drop of pastel food coloring mixed in creates festive frosting without overwhelming the delicate flavors. Gel food coloring gives better color without thinning your frosting like liquid coloring does.
- Stack your towers:
- Place one cake round down, spread with a generous layer of buttercream, top with a second round, and add a thinner frosting layer on top. Think of it like creating an edible building.
- Crown with flowers:
- Arrange your edible flowers on top of the frosting in whatever pattern feels right—symmetrical, scattered, clustered, it's your garden. The flowers sit best when the frosting is still slightly cool.
- Chill before serving:
- Fifteen minutes in the refrigerator sets everything and gives you time to arrange them on a pretty plate or cake stand. This small step makes them taste and look noticeably better.
 Save
Save Months later, my sister sent me a photo of the leftover cake scraps she'd saved, telling me she'd finally made the cake pops I'd mentioned but couldn't get them to not fall apart. I called her laughing and realized these cakes had already become our thing—something we'd reference and remake, with new variations each time.
The Secret to Tender Layers
The magic of these cakes isn't in fancy equipment or hard-to-find ingredients; it's in understanding that flour develops gluten when you mix it, and gluten makes cake tough. Once you add flour to your wet ingredients, treat the batter like something fragile that you're handling for the last time. Fold gently, mix just until combined, and resist the urge to beat everything into submission. You'll taste the difference in every bite.
Why This Works as a Mini Cake
Individual cakes bake faster and more evenly than one large cake, so you're less likely to end up with dry edges and a raw center. They also feel special and personal—each person gets their own complete cake rather than a slice, which changes how it feels to eat it. The serving size is generous enough to feel like real dessert but small enough that it doesn't overwhelm you after a meal.
Decorating Beyond the Flowers
While edible flowers are the star, you can play with your frosting in ways that make each mini cake unique. Dust the top with a tiny amount of powdered sugar, add a thin line of lemon curd between the layers, or press a few candied lemon slices into the buttercream alongside your flowers. I've also piped tiny dots of contrasting colored frosting around the base, creating a frame for the flowers. The frosting is your canvas and these little cakes are forgiving enough to handle a little creative mess.
- Tint your buttercream in two or three pastel shades and create ombré effects or marble patterns before adding flowers.
- A thin brush of simple lemon syrup between cake layers adds moisture and brightens the flavor without making anything soggy.
- Save any cake scraps in an airtight container and use them within two days for cake pops or crumbled into yogurt for a lazy breakfast.
 Save
Save These mini cakes transformed from a sister's birthday request into something I now make for friends, small celebrations, and moments when I just want to feel like a thoughtful baker. They're the kind of recipe that reminds you why homemade matters.
Recipe FAQs
- → What type of flowers are safe for decorating?
Use edible flowers such as violas, pansies, and nasturtiums that are food-safe and pesticide-free to ensure safety and flavor compatibility.
- → How can I prevent the cakes from drying out?
Brushing the cake layers with citrus syrup before assembly helps keep them moist and adds a subtle tang.
- → Can I tint the buttercream frosting?
Yes, pastel food coloring can be added to the buttercream for a festive and colorful finish.
- → What is the best way to cut the mini cakes?
After baking and cooling, use a 2.5–3 inch round cutter to create uniform mini cake layers.
- → Are leftovers suitable for another use?
Leftover cake scraps can be repurposed into cake pops or other desserts to minimize waste.
- → What allergens should be considered?
This dessert contains wheat, eggs, and dairy. Also, some edible flowers might cause allergic reactions in sensitive individuals.